Creating a natural pond in your garden allows you to install aquatic plants that will develop new graphic shapes. Such an achievement also enriches the life of the garden: birds and dragonflies will find something to cool off in summer, frogs can settle their spontaneously and you can place fish there .
For the idea to become a lasting reality, here are the elements you need to know both to decide on the surface and to concretely create your natural pool.
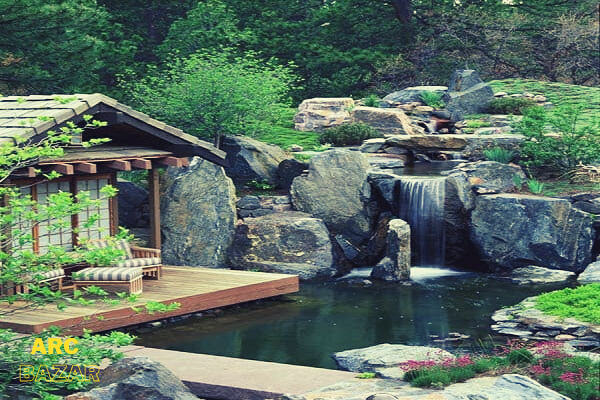
Aesthetics of the natural pond in a garden:
The harmonious layout of a garden is an art and the integration of a pond must be thought out in detail, prior to its construction. The surface of the basin, a true mirror, will reflect the sky and the lights, illuminating your garden in a new way, and perhaps your terrace, if it is located nearby.
For the balance of the ecosystem, it is preferable that part of the basin is exposed to the sun, at least a few hours a day.
A small pond will fit easily into any size garden. Inexpensive, quick to make, the fish and vegetation installed may not be able to withstand temperature variations, whether it is severe winter frosts or high summer temperatures which will promote the appearance of green algae. If a minimum of 25 m² is often recommended, 12 m² will suffice to create two levels of planting and a deep zone.
The contours of your pool should banish geometric rigor, while adopting a simple shape. Indeed, the curves present in excess will multiply the folds of the waterproof cover and will constitute so many weak points, sources of subsequent leaks.
Oxygenation of your natural pond:
The basin must maintain a satisfactory level of oxygen for life to settle there and develop. If you wish to install fish there, the size of the basin will limit their number in order to ensure a satisfactory oxygen level for the entire population.
To oxygenate your natural pond, you can favor certain aquatic plants known for their oxygenating action.
A jet of water or a waterfall will also actively contribute to the oxygenation of the pool, while bringing a pleasant sound touch. Despite these precautions, it is often necessary to resort to artificial aeration of the water. If the electrical device is integrated from the design of the pool, it will be camouflaged and the pool will retain its natural appearance.
Paperwork:
A pool not used for swimming does not require a building permit application. A statement of work is sufficient. Contacting the technical services of your municipality may also be useful to find out about any specific local planning rules relating to soil or wastewater treatment.
You also have no obligation to protect access to the pool. However, you should be aware of the risks that a water point represents for young children, even if the dimensions of the pool are modest.
A child can drown with very little water, not acquiring survival reflexes until quite late. A fence, even temporary, can ensure everyone’s safety.
Concerning the animals that you wish to import into the basin, respect the regulations on protected species , otherwise you expose yourself to heavy legal proceedings.
Realization of your natural pond:
Dig the outlines of the basin according to the limits you have chosen, creating at least two floors of at least 20 cm wide and the pit which must be at least 60 cm deep and 60 cm in diameter. This pit is essential because it will constitute a frost-free area for fish but also water lilies.
The horizontality of the future finished level must be constantly checked and if your ground is marked by a slope, be sure to rectify it.
All around the basin, you then dig a small trench, reserving the earth: it will be used to bury the edges of the tarp. Remove all the pebbles you find because they represent so many risks of piercing the tarpaulin.
Spread a 5 cm layer of sand over the entire surface of your garden natural pond. Spread a geotextile fabric over the surface to limit the development of root systems. Then spread out the waterproof tarpaulin, taking care to distribute the folds.
At this point, the tarp is held together by a few large stones all around. Indeed, you will fill the basin and wait a few days for all the elements to find their final place. After that, you can trim the excess tarp and finish the edges.
With regard to the artificial water oxygenation system, if you bury the power supply cable under the waterproof cover, any maintenance intervention will be impossible. You should therefore consider installing the device after the basin has been built but before planting.
Installation of plant and animal species:
Aquatic species are planted from April to June. Spread a layer of substrate made up of clay soil, peat and potting soil at least 20 cm thick.
Plant the species you have chosen, respecting the immersion heights. The use of baskets is ideal for non-hardy plants that you will bring in the winter, and invasive plants, such as water lilies, for which growth control will be more easily carried out. Once your plantations have been made, you can introduce the fish there.